Baking refers to the process of transferring mesh information to textures.
Baking enables various effects in Substance Painter, such as curvature (edge wear).
Starting with version 8.3, a new UI has been improved that allows you to visually adjust your Cage (cage mesh).
In this article, I would like to check the following items for baking.
・About the basic steps of baking processing (how to set up a high-poly mesh and how to change texture resolution)
・About Cage (cage mesh)
About basic baking methods
Here we will check the settings common to all texture sets.
Please see this page for details on how to change each texture set.
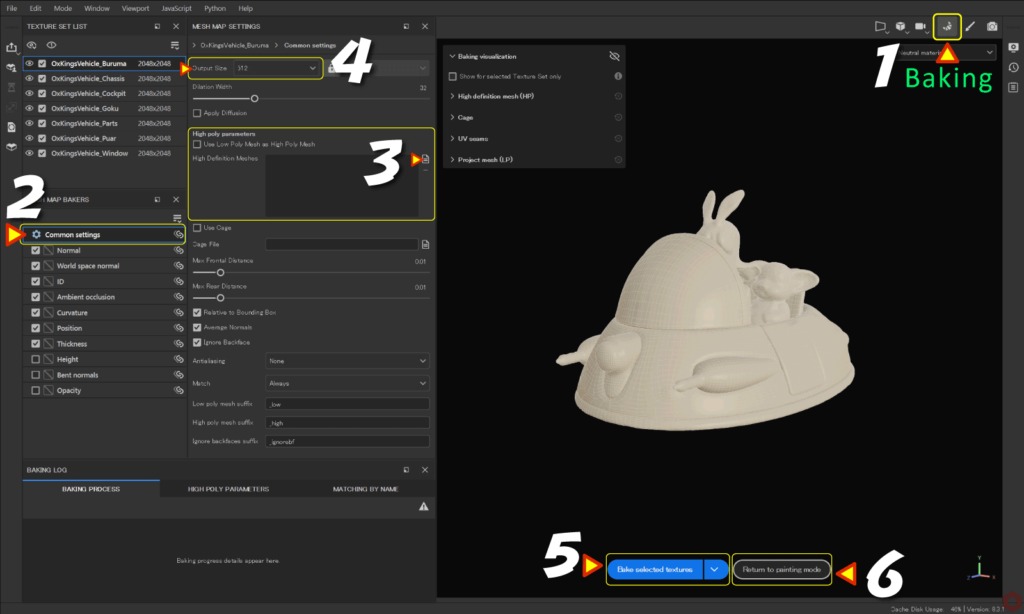
- Click the [ Croissant ] icon at the top of the screen.
- Select [ Common settings ].
- Select the high-poly mesh from [ High poly parameters ].
When not using high poly mesh
[ Use Low Poly Mesh as High Poly Mesh ]
Check here to use a low-poly mesh as a high-poly mesh. - Select the texture resolution created during baking from [Output Size].
The images below are mainly automatically generated when baking.
・Normal
・World spasce normal
・ID
・Ambient occulusion
・Curvature
・Position
・Thickness - Start the baking process with the [ Bake selected textures ] button at the bottom of the viewport.
- Click the [Return to painting mode] button to return.
About Cage (cage mesh)
Baking relies on firing rays.
Cage (cage mesh) allows you to visually see where its rays are emitted in the viewport.
The blue mesh part is the high-poly mesh, and the white mesh part that is faintly visible inside it is the low-poly mesh (the mesh being edited).
The beige wire covered from the outside is the cage (cage mesh).
How to adjust Cage (cage mesh)
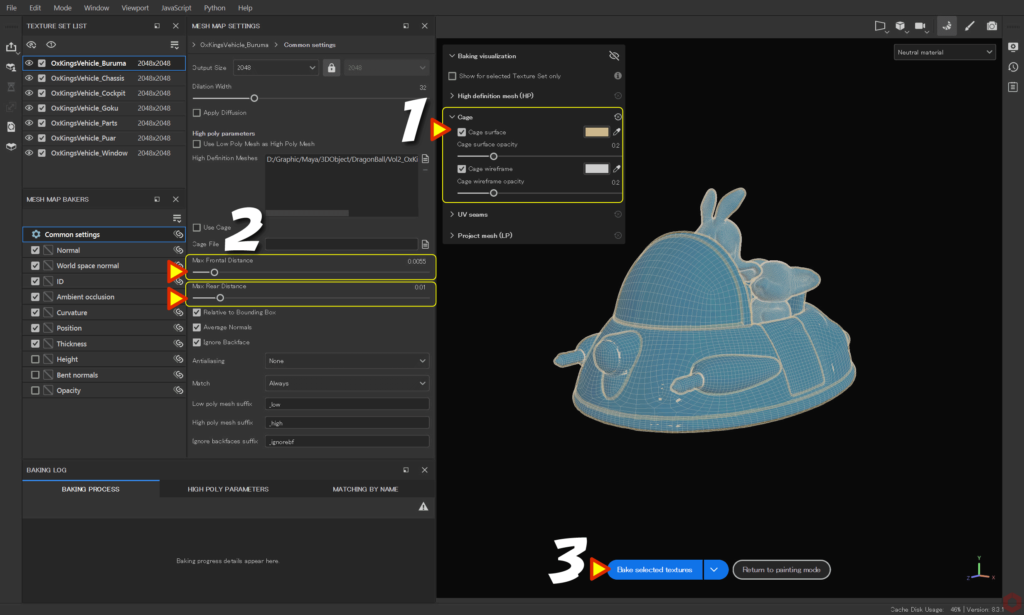
- Make sure [ Baking visualization ] and [ Cage ] display are enabled.
- Adjust the [ Max Frontal Distance ] value.
If red appears on the mesh, adjust the values so that the red disappears.
Also adjust the [ Max Rear Distance ] value.
The normal map of the recess can be clearly displayed. - Click the [ Bake selected textures ] button to start baking.
See this page for details on how to change the cage for each texture set.
To check the baking progress, click the [ Baking visualization ] icon to hide it after baking.
You can check the baking results by switching with the [ B ] key. Press the [ M ] key to return to the original state.
Set the Cage (cage mesh) slightly larger.
The total distance traveled by the ray is defined by the [ Frontal Distance ] and [ Rear Distance ]. The longer the ray, the more likely it is to hit neighboring meshes.
・When the ray is long and affects neighboring meshes (left side) / After adjustment (right side)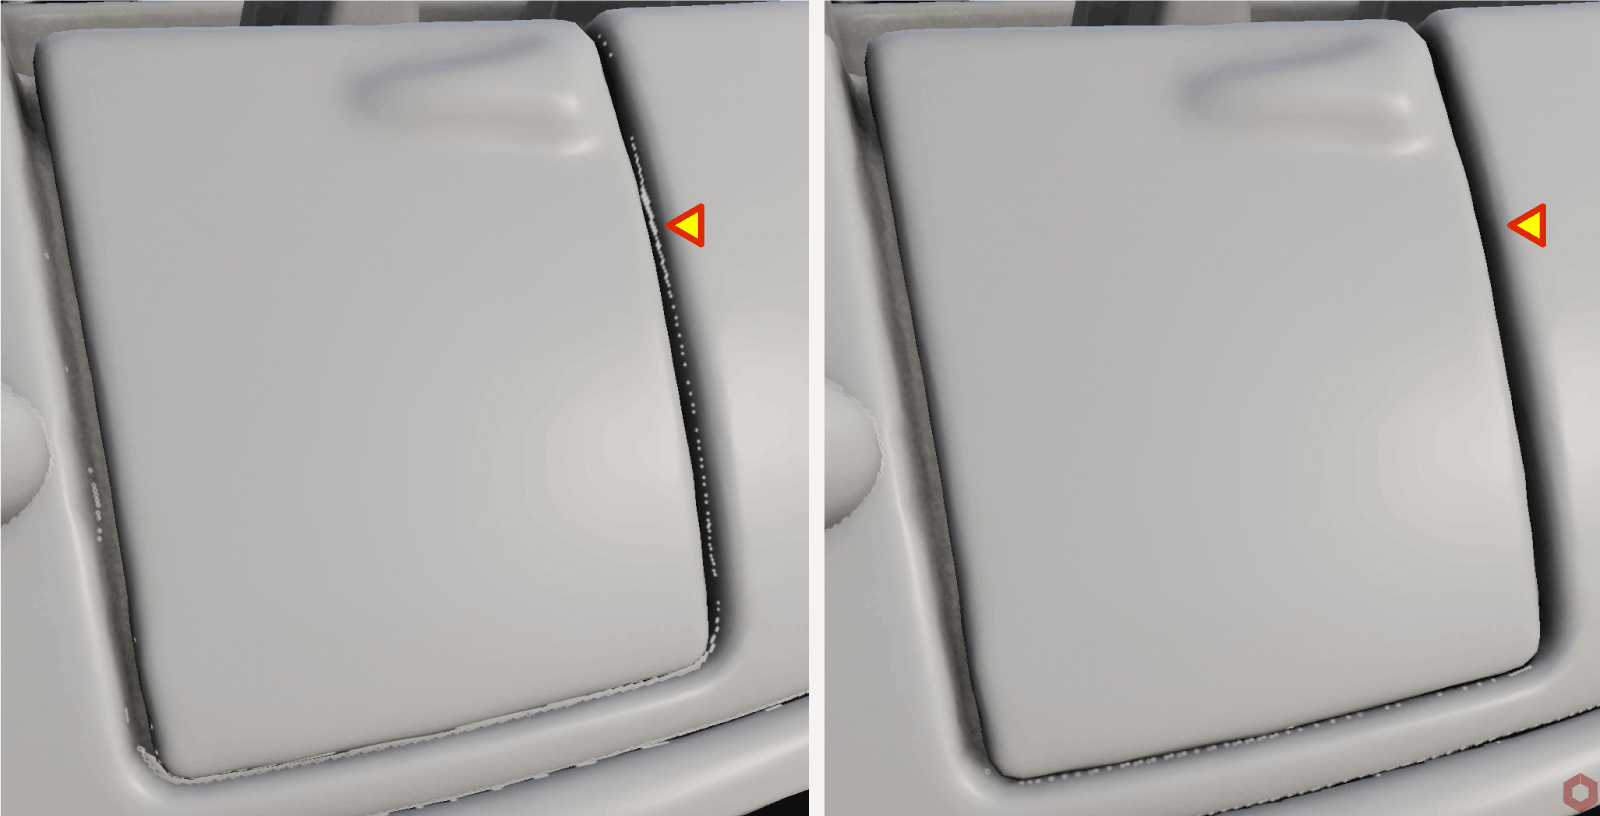
If adjusting the Cage (cage mesh) still causes noise on adjacent meshes, you can use a suffix to resolve the issue. Please refer to this page for details.
Summary
We confirmed the basic baking procedure and setting method, as well as Cage (cage mesh).
The results of baking also differ depending on how you hold UV unfold.
If noise appears or you get unintended results, please review the UV unfold and model.
Since Cage adjustments are often checked by repeating baking, we will check the following on the next page!
・How to change resolution and cage for each texture set
・Specific bake confirmation methods, such as only normal maps
Next page Let's go!
![[ Substance 3D Painter ] About Texture Set Settings](https://www.plamophy.com/wp-content/uploads/substance3dpainter-ec-texture-set-settings-01-300x125.jpg)
![[ Substance 3D Painter ] How to bake to change resolution and cage for each Texture Set](https://www.plamophy.com/wp-content/uploads/substance3dpainter-ec-baking-mode-syncparameters-01-300x125.jpg)
![[ Substance 3D Painter ] How to bake ID Map](https://www.plamophy.com/wp-content/uploads/substance3dpainter-ec-baking-id-map-01-150x150.png)
![[ Substance 3D Painter ] How to add AO (Ambient Occlusion) to painted normals using a Hard surface material](https://www.plamophy.com/wp-content/uploads/substance3dpainter-ec-painting-filter-ao-01-150x150.png)
![[ Substance 3D Painter ] How to add and adjust height map](https://www.plamophy.com/wp-content/uploads/substance3dpainter-ec-painting-height-map-01-150x150.png)
![[ Substance 3D Painter ] How to add materials to the ID Map directly on the viewport](https://www.plamophy.com/wp-content/uploads/substance3dpainter-ec-painting-filllayer-id-map-01-150x150.png)
![[ Substance 3D Painter ] マテリアル、テクスチャのインポート方法](https://www.plamophy.com/wp-content/uploads/substance3dpainter-ec-resource-import-01-300x125.jpg)
![[ Substance 3D Painter ] ベイクの手順と共通設定](https://www.plamophy.com/wp-content/uploads/substance3dpainter-ec-baking-mode-01-300x125.png)
![[ Substance 3D Painter ] テクスチャエクスポートの設定方法](https://www.plamophy.com/wp-content/uploads/substance3dpainter-ec-export-textures-01-300x125.jpg)
![[ Substance 3D Painter ] 半透明マテリアルのシェーダー設定方法](https://www.plamophy.com/wp-content/uploads/substance3dpainter-ec-shader-settings-alpha-blending-01-300x125.png)
![[ Substance 3D Painter ] ペイントブラシの設定方法](https://www.plamophy.com/wp-content/uploads/substance3dpainter-ec-painting-brush-setting-01-300x125.jpg)
![[ Substance 3D Painter ] シンメトリーを使用したペイント方法](https://www.plamophy.com/wp-content/uploads/substance3dpainter-ec-painting-brush-symmetry-01-300x125.jpg)
![[ Substance 3D Painter ] ポリゴン塗りつぶしツールを使用したマスキング方法](https://www.plamophy.com/wp-content/uploads/substance3dpainter-ec-masking-polygon-fill-01-300x125.jpg)
![[ Substance 3D Painter ] 色相の変更とグラデーションの作成方法](https://www.plamophy.com/wp-content/uploads/substance3dpainter-ec-painting-color-variations-01-300x125.jpg)
![[ Substance 3D Painter ] レンダリングの設定項目](https://www.plamophy.com/wp-content/uploads/substance3dpainter-ec-rendering-01-300x125.jpg)
![[ Substance 3D Painter ] ハイトマップの追加と調整方法](https://www.plamophy.com/wp-content/uploads/substance3dpainter-ec-painting-height-map-01-300x125.png)

![[ Introduction to Substance 3D Designer ] Basic steps to output to Substance 3D Painter](https://www.plamophy.com/wp-content/uploads/substance3ddesigner-ec-camouflage-01-300x125.jpg)
![[ Unreal Engine 5.3.1 ] How to use Procedural Content Generation (PCG)](https://www.plamophy.com/wp-content/uploads/unrealengine-ec-pcg-01-300x125.png)
![[ Substance 3D Painter ] How to use the stencil](https://www.plamophy.com/wp-content/uploads/substance3dpainter-ec-painting-brush-stencil-01-300x125.jpg)