![[ Substance 3D Painter ] How to create a fill layer](https://www.plamophy.com/wp-content/uploads/substance3dpainter-ec-painting-filllayer-02.jpg)
After baking, it's time to start creating the textures in earnest!
To create a texture, first create a fill layer and create the basic texture such as base color, roughness, and metallic.
In this article, I would like to check how to create the following two fill layers.
・About how to create a fill layer
・How to add from materials within Assets
About how to create a fill layer
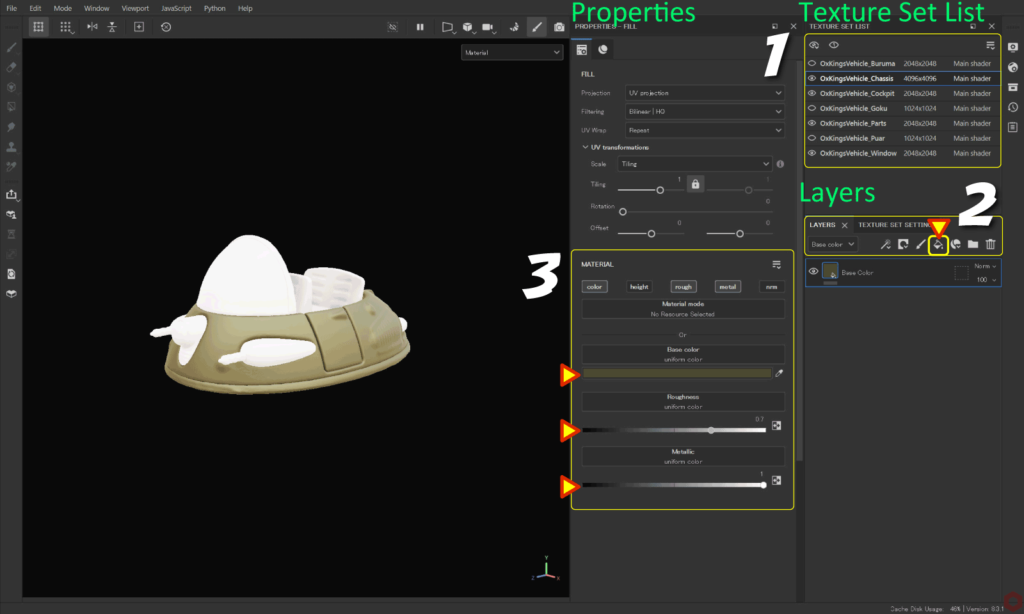
- Select the texture set you want to edit from [ Texture Set List ].
- Click the [ Add Fill layer ] icon to add a fill layer.
![]()
- Select three: [ color ], [ rough ], and [ metal ].
Click [ Base Color ] to adjust the color.
Adjust the [ Roughness ] value.
Adjust the [ Metallic ] value.
If you want to make the environment map brighter, please see this page.
Metallic values are typically 0 (nonmetallic) or 1 (metallic).
You can switch channels and check the status with the [ C ] key.
Press the [ M ] key to return to the original state.
How to add from materials within Assets
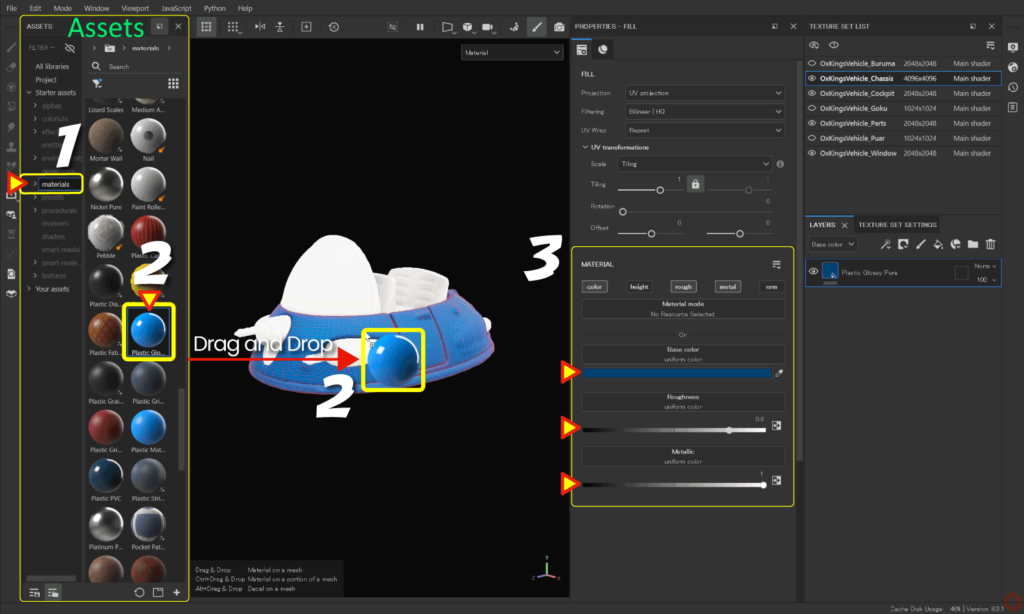
- Select [ materials ] from [ Assets ].
- Drag and drop the material directly onto the mesh you want to edit.
- Adjust the base color etc.
In addition to dragging and dropping directly into the viewport, you can also drag and drop into the [ Layers ] window.
Summary
We have confirmed how to create a fill layer.
After creating the base colors and textures, check whether the colors and textures are as intended in the environment in which you will use them.
We will proceed with creating textures while checking how they look in Substance 3D Painter and the actual lighting in the development environment.
Please see this page for details on how to output textures.
If you need to adjust the brightness of your environment map, please see this page for more information.
Check out how to add a metal filter on the next page!
Next page Let’s go!
![[ Substance 3D Painter ] How to bake ID Map](https://www.plamophy.com/wp-content/uploads/substance3dpainter-ec-baking-id-map-01-300x125.png)
![[ Substance 3D Painter ] How to add a metal filter](https://www.plamophy.com/wp-content/uploads/substance3dpainter-ec-painting-filter-01-300x125.jpg)

![[ Substance 3D Painter ] How to set up texture export](https://www.plamophy.com/wp-content/uploads/substance3dpainter-ec-export-textures-01-150x150.jpg)
![[ Substance 3D Painter ] How to set the environment map and adjust brightness](https://www.plamophy.com/wp-content/uploads/substance3dpainter-ec-display-settings-01-150x150.jpg)
![[ Substance 3D Painter ] About layer instancing](https://www.plamophy.com/wp-content/uploads/substance3dpainter-ec-painting-layer-instancing-01-150x150.jpg)
![[ Substance 3D Painter ] マテリアル、テクスチャのインポート方法](https://www.plamophy.com/wp-content/uploads/substance3dpainter-ec-resource-import-01-300x125.jpg)
![[ Substance 3D Painter ] ベイクの手順と共通設定](https://www.plamophy.com/wp-content/uploads/substance3dpainter-ec-baking-mode-01-300x125.png)
![[ Substance 3D Painter ] テクスチャエクスポートの設定方法](https://www.plamophy.com/wp-content/uploads/substance3dpainter-ec-export-textures-01-300x125.jpg)
![[ Substance 3D Painter ] 半透明マテリアルのシェーダー設定方法](https://www.plamophy.com/wp-content/uploads/substance3dpainter-ec-shader-settings-alpha-blending-01-300x125.png)
![[ Substance 3D Painter ] ペイントブラシの設定方法](https://www.plamophy.com/wp-content/uploads/substance3dpainter-ec-painting-brush-setting-01-300x125.jpg)
![[ Substance 3D Painter ] シンメトリーを使用したペイント方法](https://www.plamophy.com/wp-content/uploads/substance3dpainter-ec-painting-brush-symmetry-01-300x125.jpg)
![[ Substance 3D Painter ] ポリゴン塗りつぶしツールを使用したマスキング方法](https://www.plamophy.com/wp-content/uploads/substance3dpainter-ec-masking-polygon-fill-01-300x125.jpg)
![[ Substance 3D Painter ] 色相の変更とグラデーションの作成方法](https://www.plamophy.com/wp-content/uploads/substance3dpainter-ec-painting-color-variations-01-300x125.jpg)
![[ Substance 3D Painter ] レンダリングの設定項目](https://www.plamophy.com/wp-content/uploads/substance3dpainter-ec-rendering-01-300x125.jpg)
![[ Substance 3D Painter ] 環境マップの設定と明るさの調整方法](https://www.plamophy.com/wp-content/uploads/substance3dpainter-ec-display-settings-01-300x125.jpg)
![[ Introduction to Substance 3D Designer ] Basic steps to output to Substance 3D Painter](https://www.plamophy.com/wp-content/uploads/substance3ddesigner-ec-camouflage-01-300x125.jpg)
![[ Unreal Engine 5.3.1 ] How to use Procedural Content Generation (PCG)](https://www.plamophy.com/wp-content/uploads/unrealengine-ec-pcg-01-300x125.png)
![[ Substance 3D Painter ] How to use the stencil](https://www.plamophy.com/wp-content/uploads/substance3dpainter-ec-painting-brush-stencil-01-300x125.jpg)