![[ Substance 3D Painter ] How to import materials and textures](https://www.plamophy.com/wp-content/uploads/substance3dpainter-ec-resource-import-01.jpg)
When importing materials and textures, there are several setting items such as Usage and import location. By setting them, you can sort and manage them by category after importing.
In addition to creating materials in Substance 3D Designer, you can also download materials from the Substance 3D Assets library.
In this article, I would like to check how to import materials and texture materials.
How to import materials
Materials from the Substance 3D Assets library can be downloaded here.
Substance 3D Assets Library
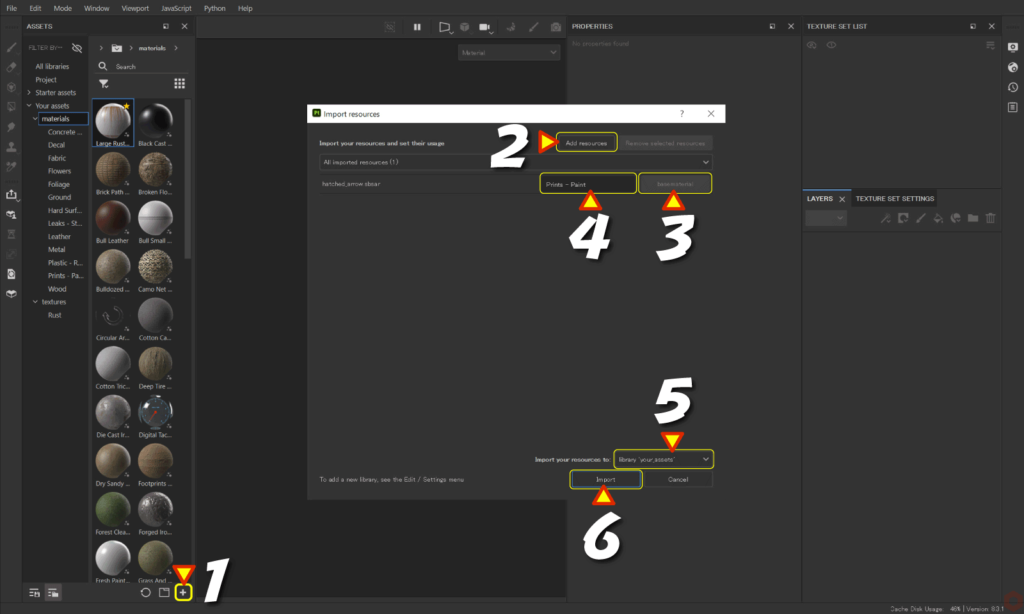
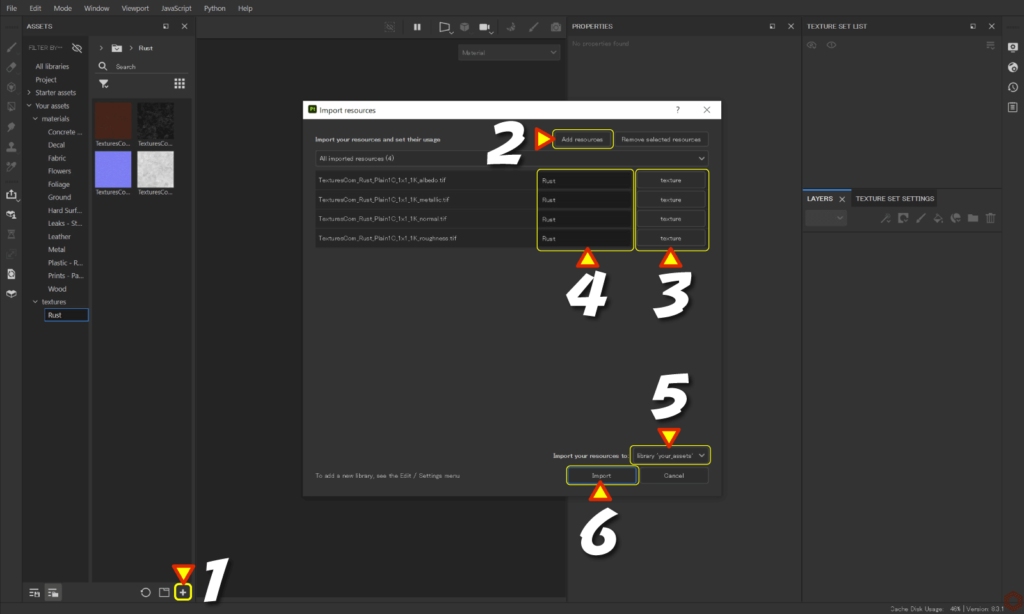
- To import, select File -> Import resources.
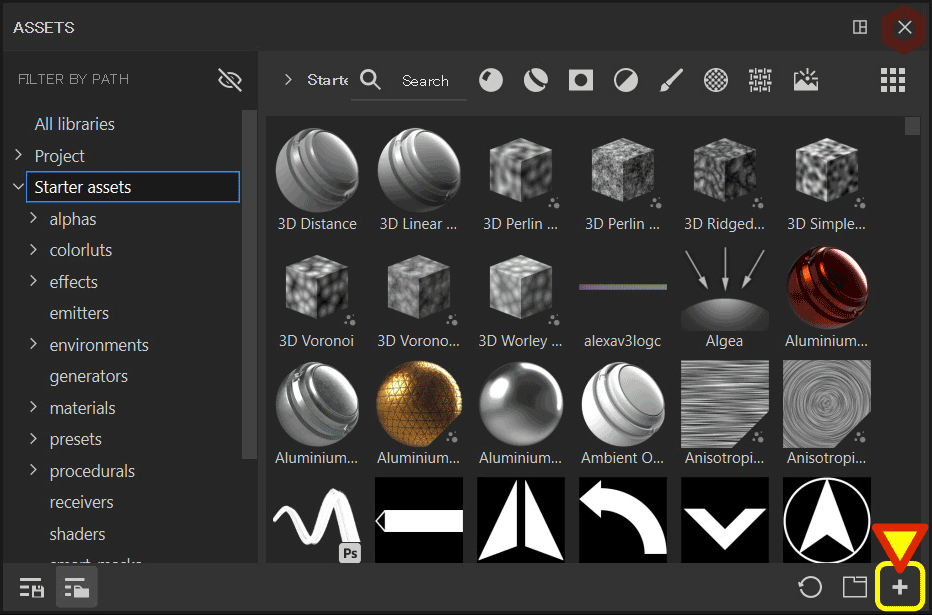
Alternatively, click the [ + ] button in the [ Assets ] window.![]()
- A new window will open, click the [ Add resources ] button and select the files you want to import.
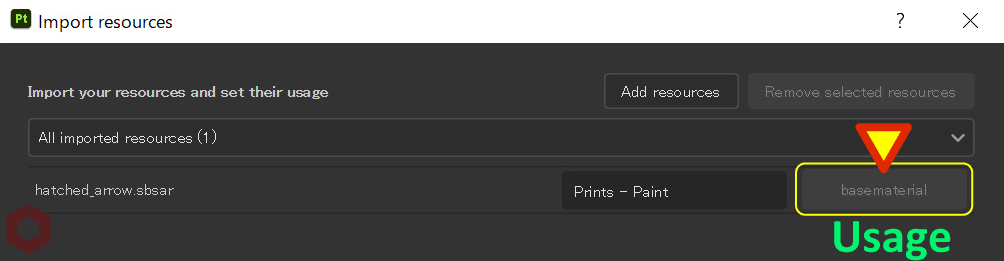
- Set [Usage].
![]()
Please select the item depending on the use of the material to be imported.
Select [ basematerial ] for material, or [ texture ] for textures.
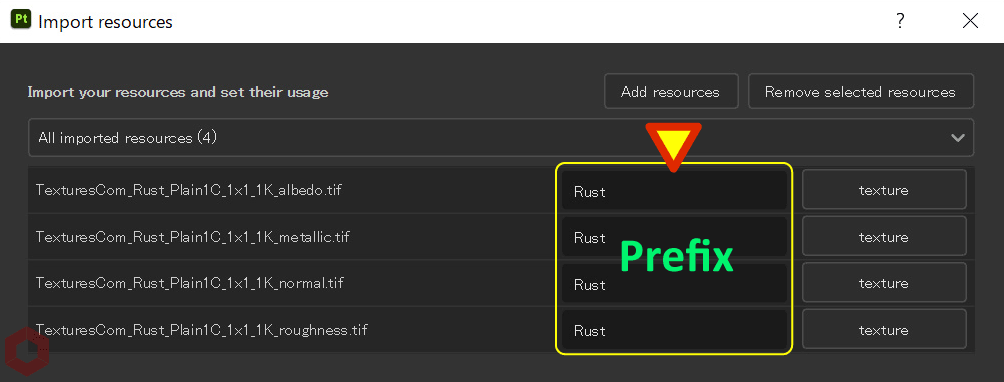
Files downloaded from the Substance 3D Assets library may have defined and fixed usage. - Set [ Prefix ].
![]()
The name specified here will be the import destination folder name. - Set [ Import your resources to ].
![]()
・current session
It will be imported temporarily.
Resources are lost when the application is restarted.
・ project
It will only be imported into the file (project) you are currently working on.
This resource cannot be used by other files (projects).
・ library 'your assets'
Import into library.
Resources are available for use at any time after they are imported. - Click the [ Import ] button.
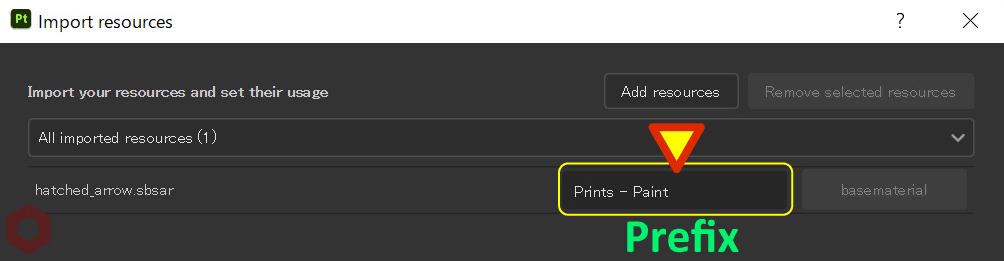

When imported, it will be imported to the folder with the name set in Prefix in [ Your assets ] in the [ Assets ] window.
About how to import textures
Texture materials can be downloaded here.
Textures.com
- To import, select File -> Import resources.
Alternatively, click the [ + ] button in the [ Assets ] window.![]()
- Click the [ Add resources ] button and select the textures you want to import.
- Set [ Usage ].
![]()
Please select the item depending on the use of the imported material.
Here, select [ texture ] for the texture material.
If there are multiple resources, select them all and then make changes. - Set [ Prefix ].
![]()
The name specified here becomes the import destination folder name. - Set [ Import your resources to ].
![]()
・ current session
It will be imported temporarily.
Resources are lost when the application is restarted.
・ project
It will only be imported into the file (project) you are currently working on.
This resource cannot be used by other files (projects).
・ library 'your assets'
Import into library.
Resources are available for use at any time after they are imported. - Click the [ Import ] button.

When imported, it will be imported to the folder with the name set in Prefix in [ Your assets ] in the [ Assets ] window.
Summary
We have confirmed how to import materials and textures.
If you want to reload a resource, delete it, or find the folder location to import it, right-click the resource and select Item.
On the next page, we will check how to set up the imported materials!
Next page Let’s go!
On this page, we will check how to set up the imported textures!
Go to this page Let's go!
![[ Substance 3D Painter ] How to add and adjust height map](https://www.plamophy.com/wp-content/uploads/substance3dpainter-ec-painting-height-map-01-300x125.png)
![[ Substance 3D Painter ] How to set up imported materials](https://www.plamophy.com/wp-content/uploads/substance3dpainter-ec-painting-decal-import-01-300x125.jpg)
![[ Substance 3D Painter ] How to add and adjust height map](https://www.plamophy.com/wp-content/uploads/substance3dpainter-ec-painting-height-map-01-150x150.png)

![[ Unreal Engine 5.3.1 ] How to use Procedural Content Generation (PCG)](https://www.plamophy.com/wp-content/uploads/unrealengine-ec-pcg-01-150x150.png)
![[ Substance 3D Painter ] How to add AO (Ambient Occlusion) to painted normals using a Hard surface material](https://www.plamophy.com/wp-content/uploads/substance3dpainter-ec-painting-filter-ao-01-150x150.png)
![[ Substance 3D Painter ] マテリアル、テクスチャのインポート方法](https://www.plamophy.com/wp-content/uploads/substance3dpainter-ec-resource-import-01-300x125.jpg)
![[ Substance 3D Painter ] ベイクの手順と共通設定](https://www.plamophy.com/wp-content/uploads/substance3dpainter-ec-baking-mode-01-300x125.png)
![[ Substance 3D Painter ] テクスチャエクスポートの設定方法](https://www.plamophy.com/wp-content/uploads/substance3dpainter-ec-export-textures-01-300x125.jpg)
![[ Substance 3D Painter ] 半透明マテリアルのシェーダー設定方法](https://www.plamophy.com/wp-content/uploads/substance3dpainter-ec-shader-settings-alpha-blending-01-300x125.png)
![[ Substance 3D Painter ] ペイントブラシの設定方法](https://www.plamophy.com/wp-content/uploads/substance3dpainter-ec-painting-brush-setting-01-300x125.jpg)
![[ Substance 3D Painter ] シンメトリーを使用したペイント方法](https://www.plamophy.com/wp-content/uploads/substance3dpainter-ec-painting-brush-symmetry-01-300x125.jpg)
![[ Substance 3D Painter ] ポリゴン塗りつぶしツールを使用したマスキング方法](https://www.plamophy.com/wp-content/uploads/substance3dpainter-ec-masking-polygon-fill-01-300x125.jpg)
![[ Substance 3D Painter ] 色相の変更とグラデーションの作成方法](https://www.plamophy.com/wp-content/uploads/substance3dpainter-ec-painting-color-variations-01-300x125.jpg)
![[ Substance 3D Painter ] レンダリングの設定項目](https://www.plamophy.com/wp-content/uploads/substance3dpainter-ec-rendering-01-300x125.jpg)
![[ Introduction to Substance 3D Designer ] Basic steps to output to Substance 3D Painter](https://www.plamophy.com/wp-content/uploads/substance3ddesigner-ec-camouflage-01-300x125.jpg)
![[ Unreal Engine 5.3.1 ] How to use Procedural Content Generation (PCG)](https://www.plamophy.com/wp-content/uploads/unrealengine-ec-pcg-01-300x125.png)
![[ Substance 3D Painter ] How to use the stencil](https://www.plamophy.com/wp-content/uploads/substance3dpainter-ec-painting-brush-stencil-01-300x125.jpg)