![[ Substance 3D Painter ] Hard Surface 素材を使用してノーマルにペイントする方法](https://www.plamophy.com/wp-content/uploads/substance3dpainter-ec-painting-brush-normal-01.jpg)
![[ Substance 3D Painter ] 半透明マテリアルのシェーダー設定方法](https://www.plamophy.com/wp-content/uploads/substance3dpainter-ec-shader-settings-alpha-blending-01.png)

![[ Substance 3D Designer 入門 ] Substance 3D Painter に出力するまでの基本的な手順について](https://www.plamophy.com/wp-content/uploads/substance3ddesigner-ec-camouflage-01.jpg)
![[ Unreal Engine 5.3.1 ] Procedural Content Generation (PCG) の使用方法について](https://www.plamophy.com/wp-content/uploads/unrealengine-ec-pcg-01.png)
![[ Zbrush ] UIをカスタムする方法について](https://www.plamophy.com/wp-content/uploads/ZBrush_ui-customization_01.jpg)
![[ Zbrush ] データの保存とロード方法について](https://www.plamophy.com/wp-content/uploads/ZBrush_data_storage_format_01.jpg)
![[ Youtube ] おすすめの一覧です](https://www.plamophy.com/wp-content/uploads/youtube-recommended-list.jpg)
![[ Substance 3D Painter ] 新規作成とノーマルに関する設定項目](https://www.plamophy.com/wp-content/uploads/substance3dpainter-ec-newproject-creation-01.jpg)
本記事では、ノーマルに関する設定を中心に、新規作成時の設定項目について確認したいと思います。
ノーマルに関する設定
新規プロジェクト作成時に、テクスチャ解像度などの設定の他に、以下2つノーマルに関する設定項目があります。
・Normal Map Format
・Compute Tangent Space Per Fragment
ノーマルに関する設定は「ゲームエンジン」や「レンダリングソフトウェア」によって設定が異なるため、作成前に正確に設定しておく必要があります。
テンプレートについて
ノーマルに関する設定は、Template を活用することで自動に変更してくれます。
Template は複数用意されていますので、この中から作成したテクスチャを使用するソフトウェアにあわせて Template を選択します。
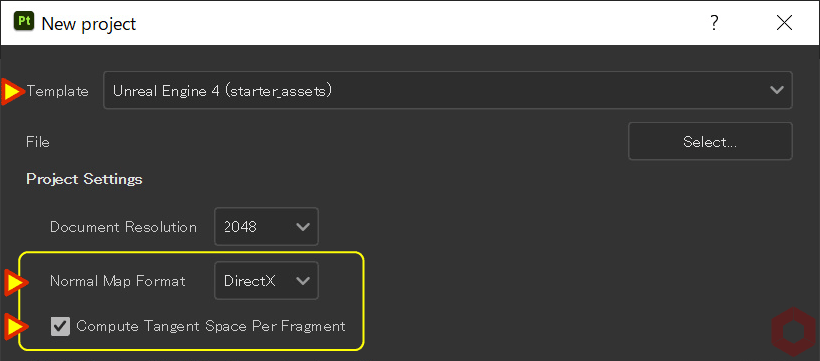
例えばゲームエンジンの Unreal Engin の場合は以下のようになります。
・Normal Map Format : Direct X
・Compute Tangent Space Per Fragment : ON
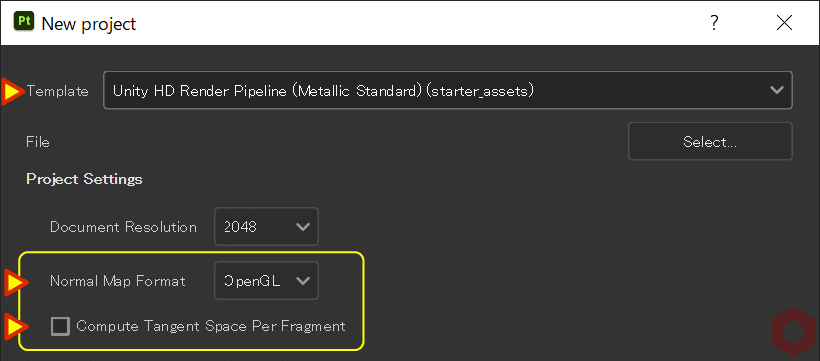
また、ゲームエンジンの Unity や 3Dソフトウェアの Blender の場合は以下のようになります。
・Normal Map Format : OpenGL
・Compute Tangent Space Per Fragment : OFF
テクスチャ解像度、その他 設定項目
・Document Resolution
テクスチャ解像度を指定します。
プロジェクト作成後にテクスチャセットごとに変更することができます。
詳しくはこちらのページをご参照ください。
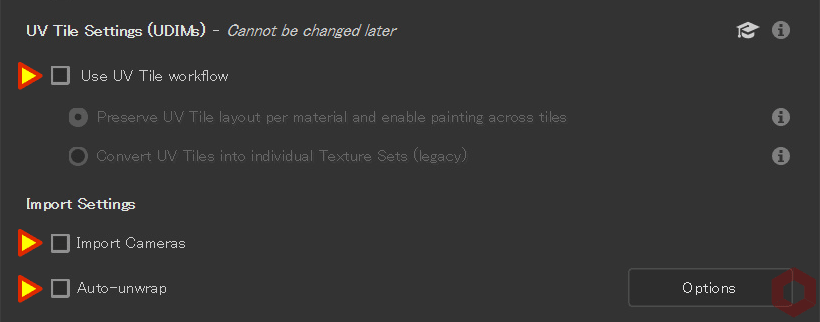
・Use UV Tile workflow
通常のUV範囲 (0~1) の外でペイントができるようになります。
・Import Cameras
カメラがメッシュファイルに存在する場合、カメラも一緒にインポートできます。
・Auto-unwrap
インポートされたメッシュに不足しているUVが自動に生成されます。
まとめ
ノーマルの設定を中心に新規プロジェクト作成時の設定項目について確認いたしました。
設定の違いによって、メモリ節約や処理時間に影響があり、法線マップの見え方にも微妙な違いが生じるようですので、Template を活用して正しい設定をしていきましょう!
次のページでは、環境マップの設定と明るさの調整方法について確認します!
次のページへ Let's go!
![[ Substance 3D Painter ] 環境マップの設定と明るさの調整方法](https://www.plamophy.com/wp-content/uploads/substance3dpainter-ec-display-settings-01-300x125.jpg)
![[ Substance 3D Painter ] シンメトリーを使用したペイント方法](https://www.plamophy.com/wp-content/uploads/substance3dpainter-ec-painting-brush-symmetry-01.jpg)
![[ Substance 3D Painter ] ID Map を使用したマスキング方法](https://www.plamophy.com/wp-content/uploads/substance3dpainter-ec-masking-id-map-01-150x150.png)
![[ Substance 3D Painter ] インポートしたテクスチャの設定方法](https://www.plamophy.com/wp-content/uploads/substance3dpainter-ec-painting-filllayer-texture-01-150x150.jpg)
![[ Substance 3D Painter ] Hard surface 素材を使用したノーマルに AO(陰影)をつける方法](https://www.plamophy.com/wp-content/uploads/substance3dpainter-ec-painting-filter-ao-01-150x150.png)
![[ Substance 3D Painter ] ベイクの手順と共通設定](https://www.plamophy.com/wp-content/uploads/substance3dpainter-ec-baking-mode-01-150x150.png)
![[ Substance 3D Painter ] マテリアル、テクスチャのインポート方法](https://www.plamophy.com/wp-content/uploads/substance3dpainter-ec-resource-import-01-300x125.jpg)
![[ Substance 3D Painter ] ベイクの手順と共通設定](https://www.plamophy.com/wp-content/uploads/substance3dpainter-ec-baking-mode-01-300x125.png)
![[ Substance 3D Painter ] テクスチャエクスポートの設定方法](https://www.plamophy.com/wp-content/uploads/substance3dpainter-ec-export-textures-01-300x125.jpg)
![[ Substance 3D Painter ] 半透明マテリアルのシェーダー設定方法](https://www.plamophy.com/wp-content/uploads/substance3dpainter-ec-shader-settings-alpha-blending-01-300x125.png)
![[ Substance 3D Painter ] ペイントブラシの設定方法](https://www.plamophy.com/wp-content/uploads/substance3dpainter-ec-painting-brush-setting-01-300x125.jpg)
![[ Substance 3D Painter ] シンメトリーを使用したペイント方法](https://www.plamophy.com/wp-content/uploads/substance3dpainter-ec-painting-brush-symmetry-01-300x125.jpg)
![[ Substance 3D Painter ] ポリゴン塗りつぶしツールを使用したマスキング方法](https://www.plamophy.com/wp-content/uploads/substance3dpainter-ec-masking-polygon-fill-01-300x125.jpg)
![[ Substance 3D Painter ] 色相の変更とグラデーションの作成方法](https://www.plamophy.com/wp-content/uploads/substance3dpainter-ec-painting-color-variations-01-300x125.jpg)
![[ Substance 3D Painter ] レンダリングの設定項目](https://www.plamophy.com/wp-content/uploads/substance3dpainter-ec-rendering-01-300x125.jpg)
![[ Zbrush ] データの保存とロード方法について](https://www.plamophy.com/wp-content/uploads/ZBrush_data_storage_format_01-300x169.jpg)
![[ Zbrush ] UIをカスタムする方法について](https://www.plamophy.com/wp-content/uploads/ZBrush_ui-customization_01-300x169.jpg)
![[ Zbrush ] 起動時に LihgtBox を非表示にする設定方法](https://www.plamophy.com/wp-content/uploads/ZBrush_lightbbox_01-300x169.jpg)
![[ Zbrush ] スカルプトするまでの手順](https://www.plamophy.com/wp-content/uploads/ZBrush_3d-edit-mode_03-300x169.jpg)
![[ Zbrush ] ドキュメントサイズの設定方法](https://www.plamophy.com/wp-content/uploads/ZBrush_document-size_10-300x169.jpg)